

How to integrate the Mpesa STK push API in Nodejs.
Lipa na Mpesa STK push Nodejs (Mpesa Express)


Overview
By the end of this guide, you should be able to integrate the Mpesa express API in Nodejs and express. You will achieve this in several steps:
Authorize your Mpesa API by generating an access token for every API call
Invoke the STK push endpoint that prompts the user to impute their mpesa pin to authorize transactions
Have a callback that saves the transaction details to a database of your choice.
Confirm payments
Prerequisites:
Safaricom developer account. Create one here
Node js installed
Postman
The project folder structure for this guide is as shown below.
Project_Folder
└───controllers
      | controllers.lipanampesa.js
└───middlewares
      | middlewares.generateAccessToken.js
└───routes
      | routes.lipanampesa.js
└───utils
      | utils.timestamp.js

| server.js
| package.json
| .env
Setup
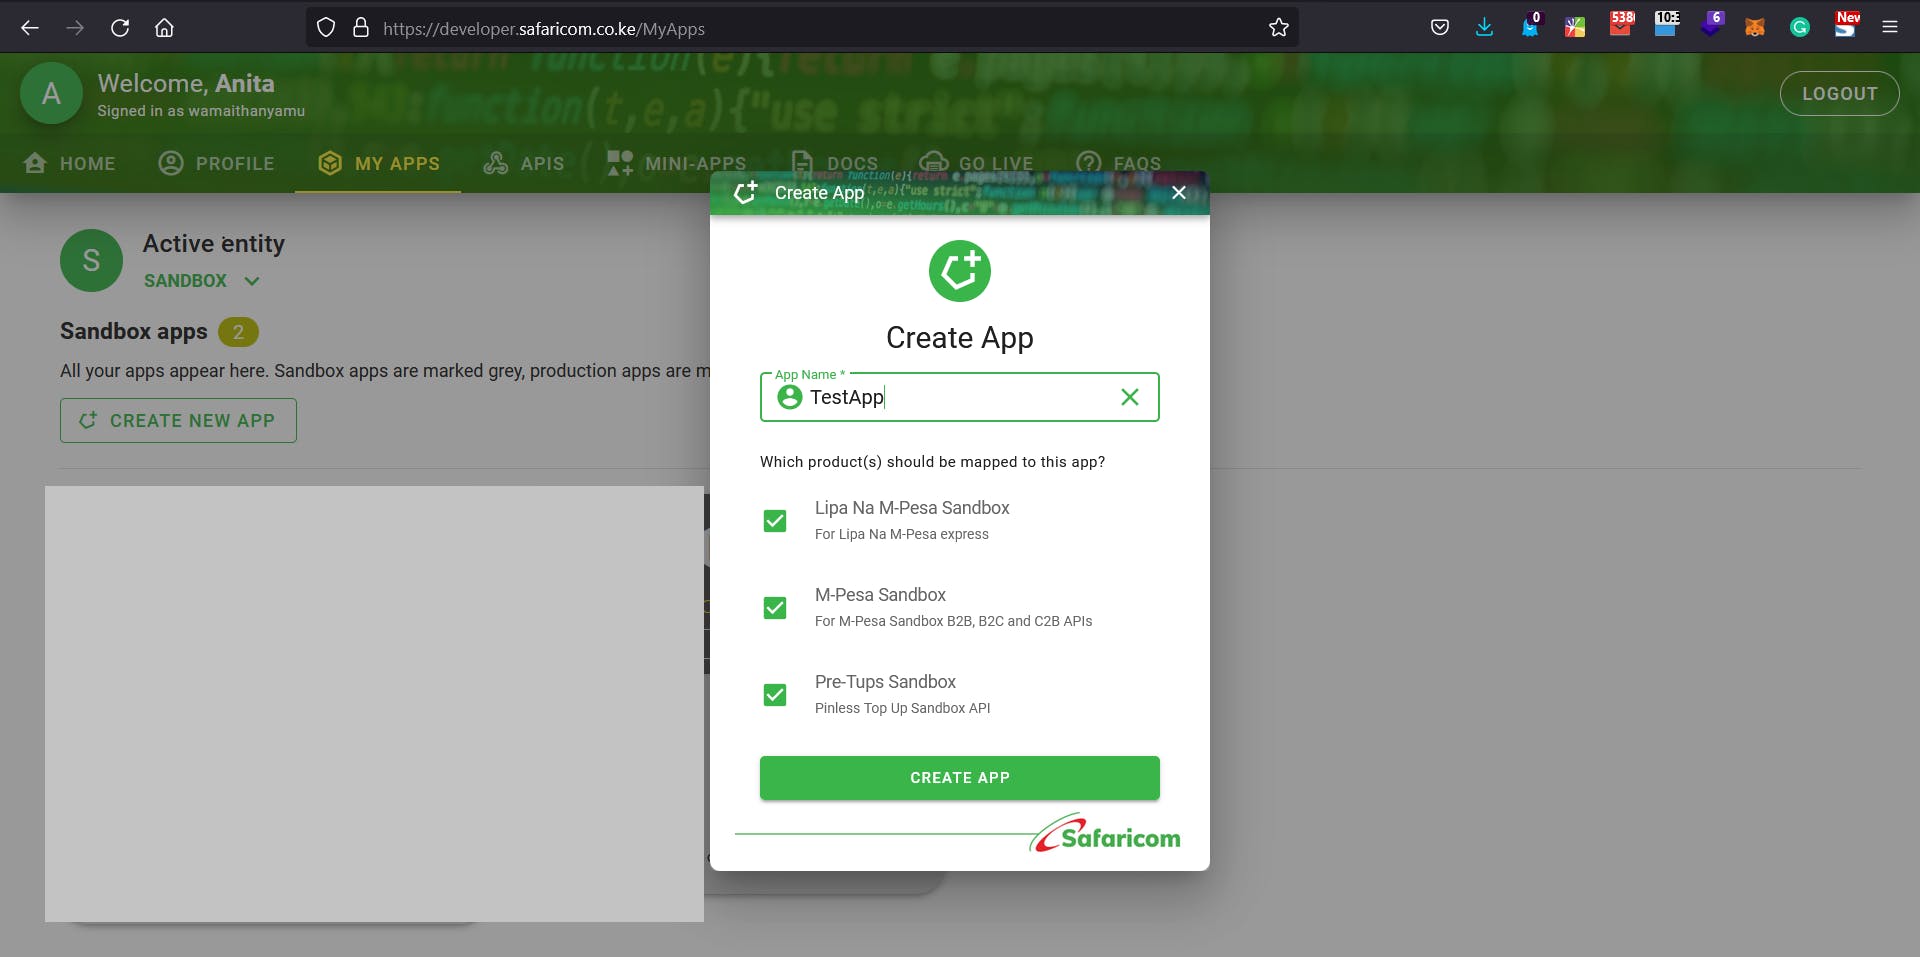
Log on to the developer portal and create an app.
Click on show key/secret to reveal the test application's consumer key and secret key.
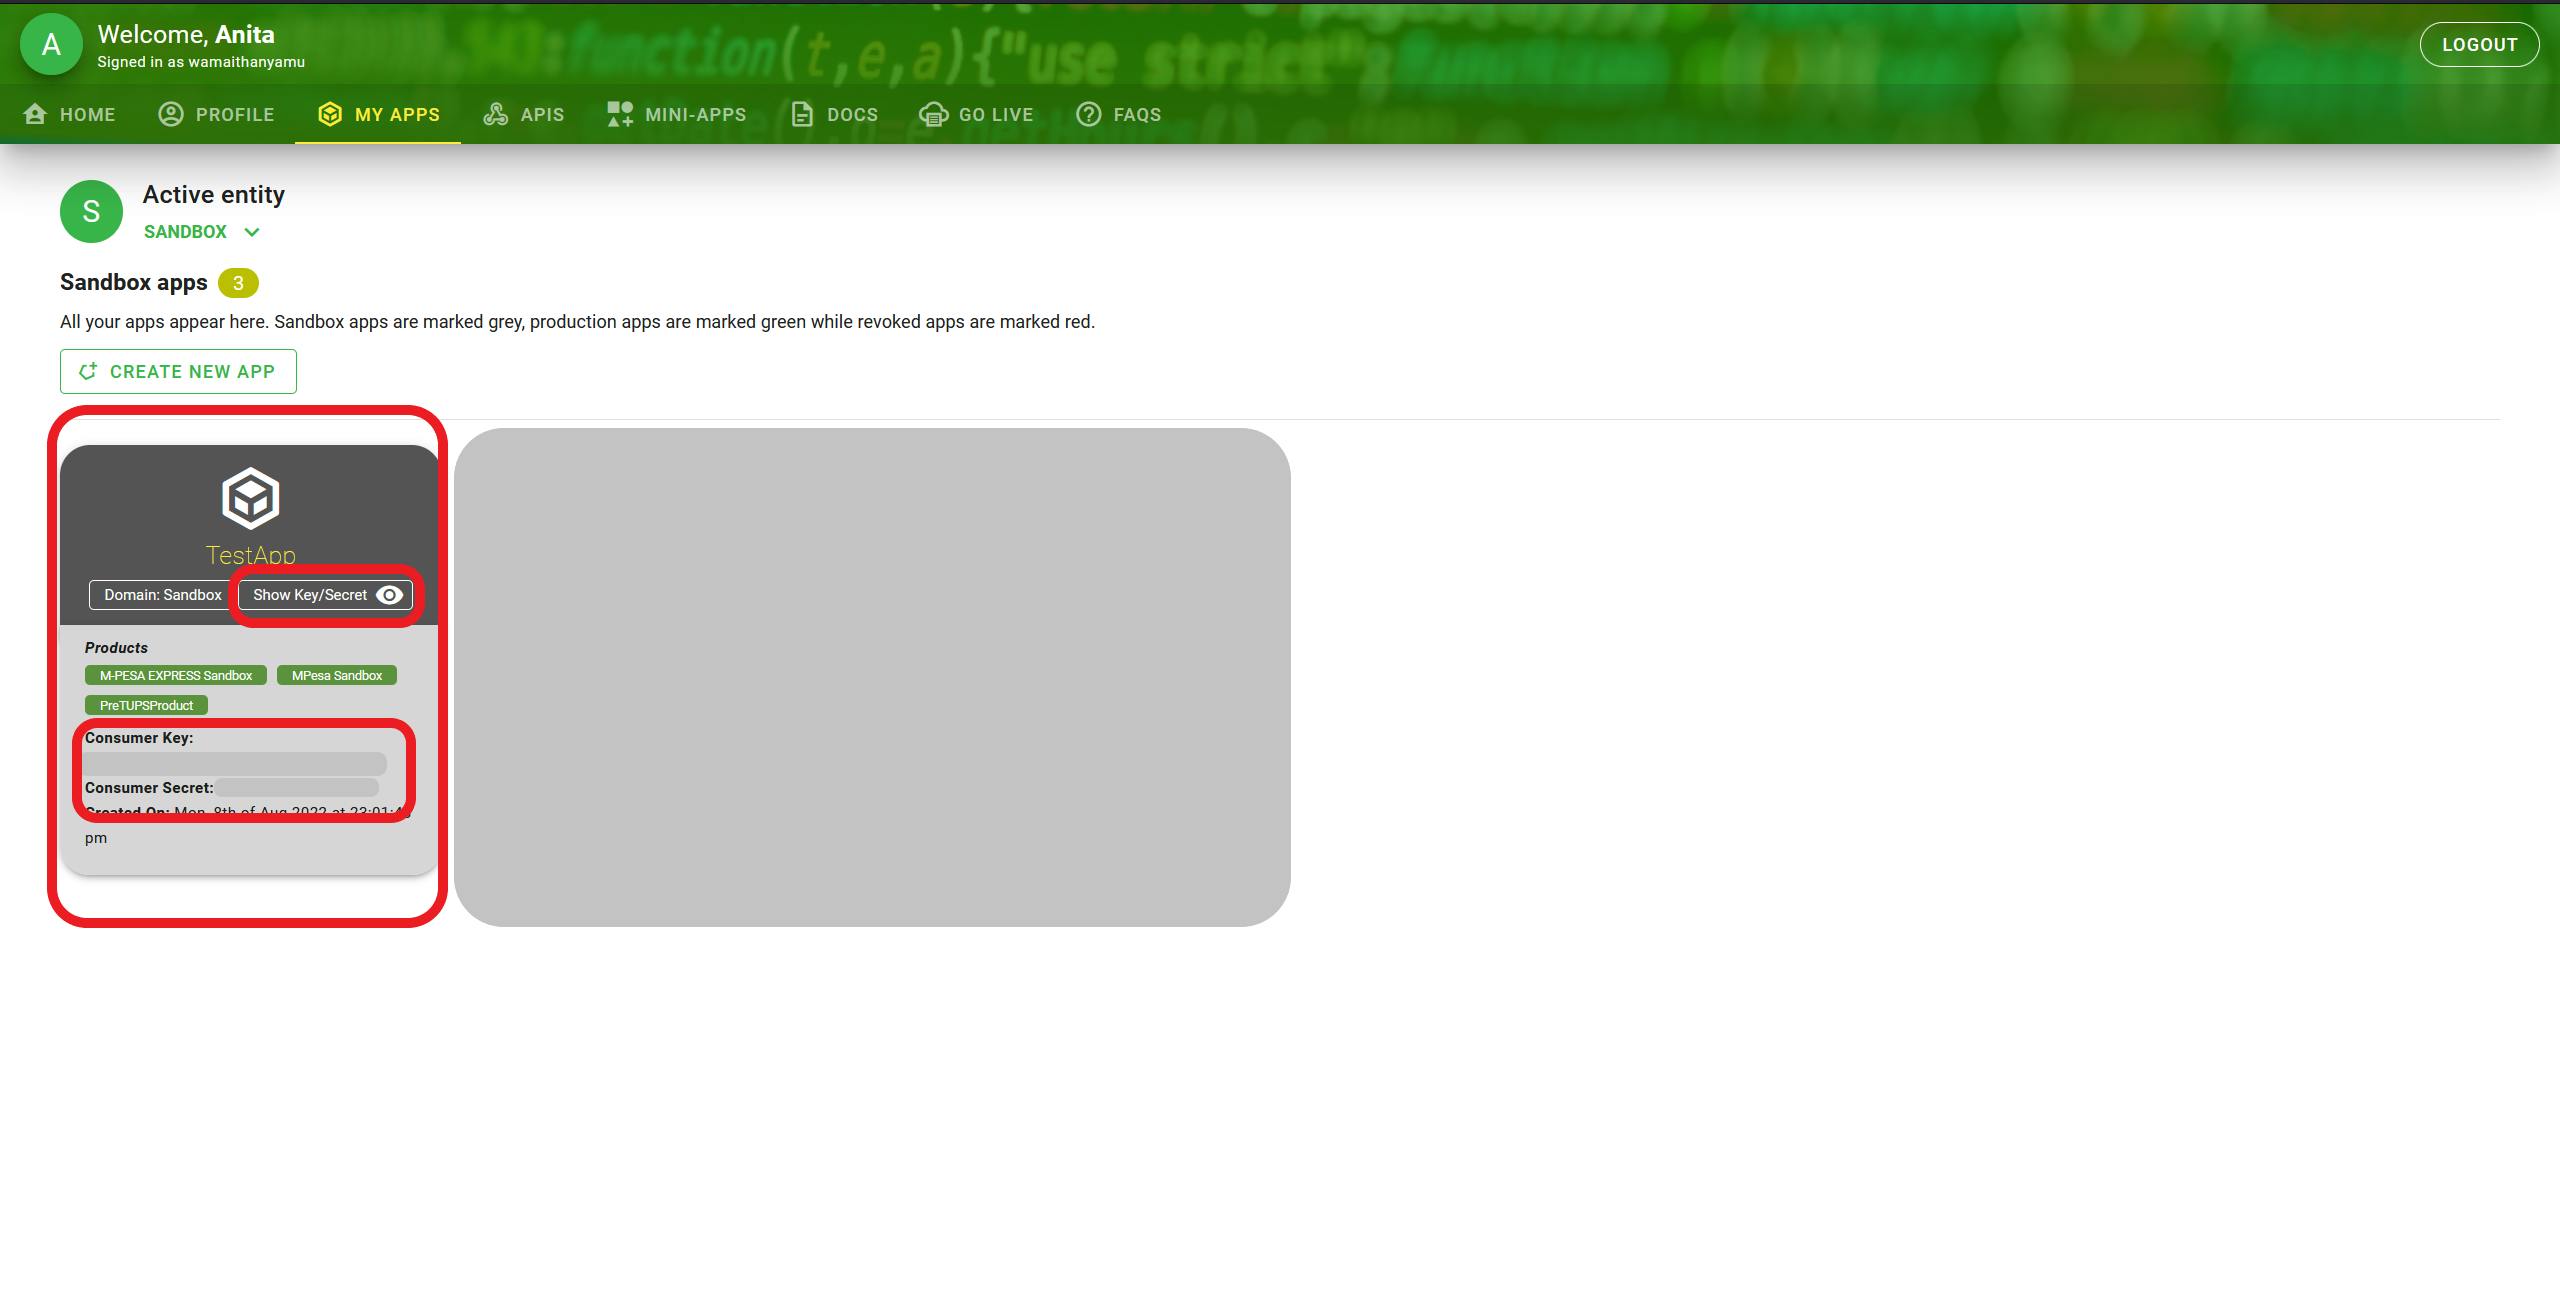
Save the consumer key and the secret key in the .env file
SAFARICOM_CONSUMER_SECRET=paste_secret_here
SAFARICOM_CONSUMER_KEY=paste_key_here
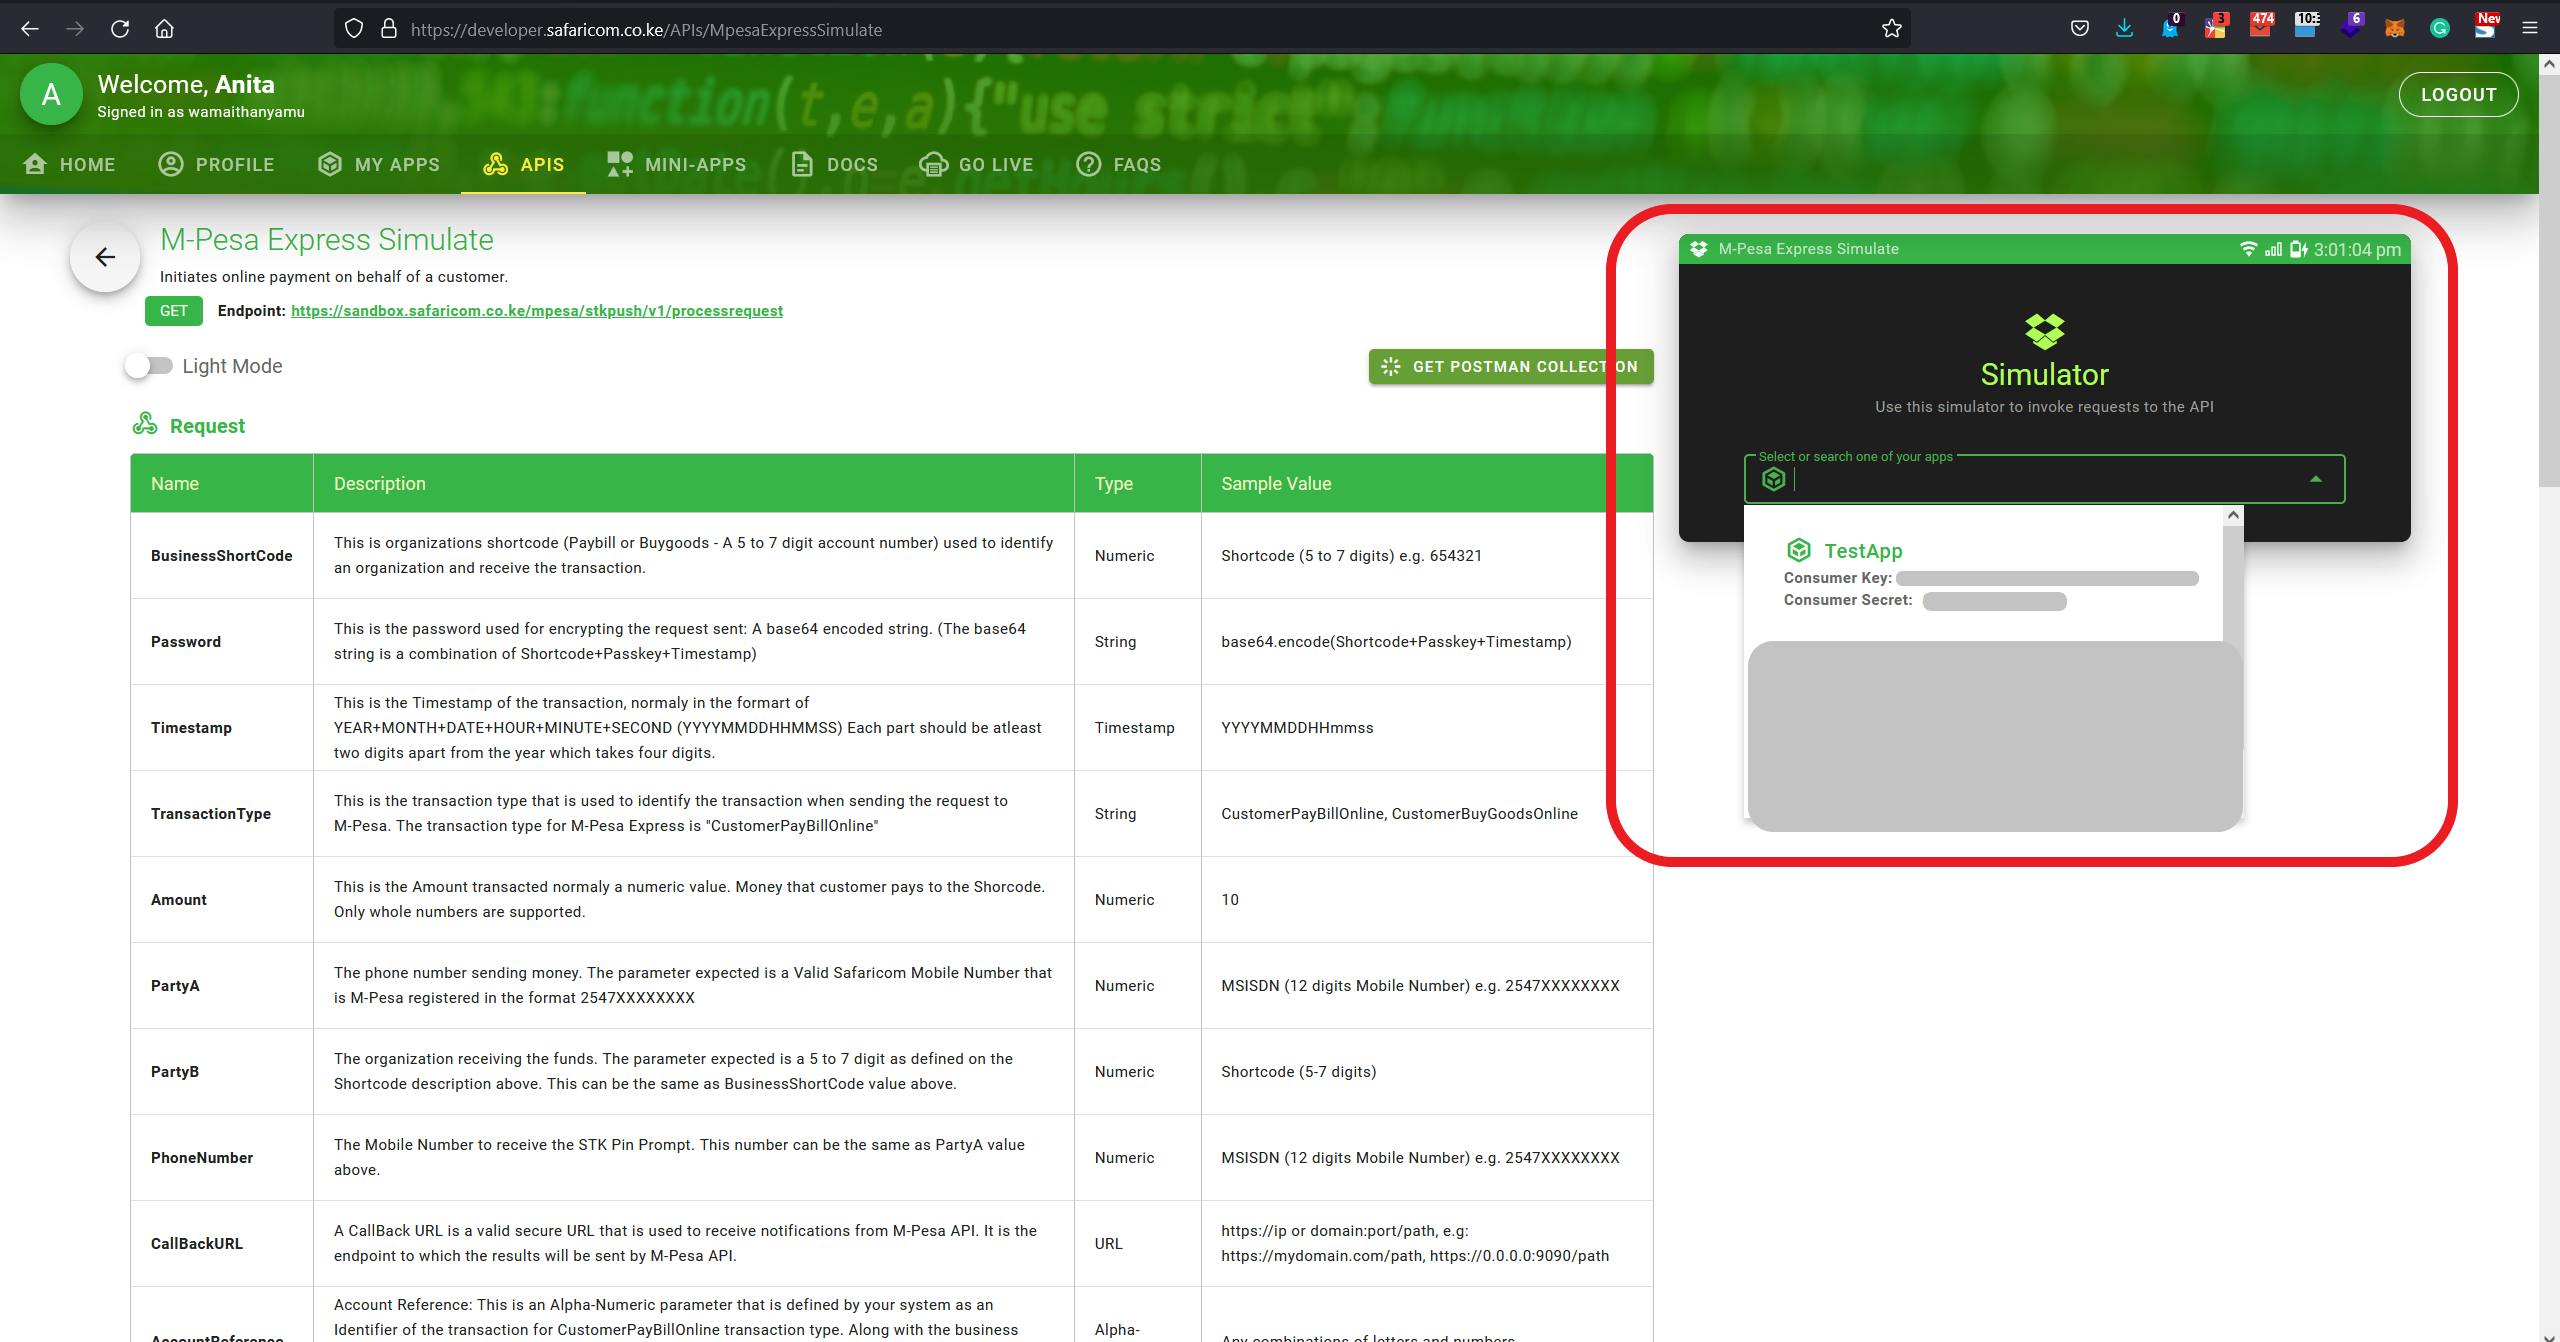
On the navbar, switch to the APIS tab, then click on the simulate button on the Mpesa express card
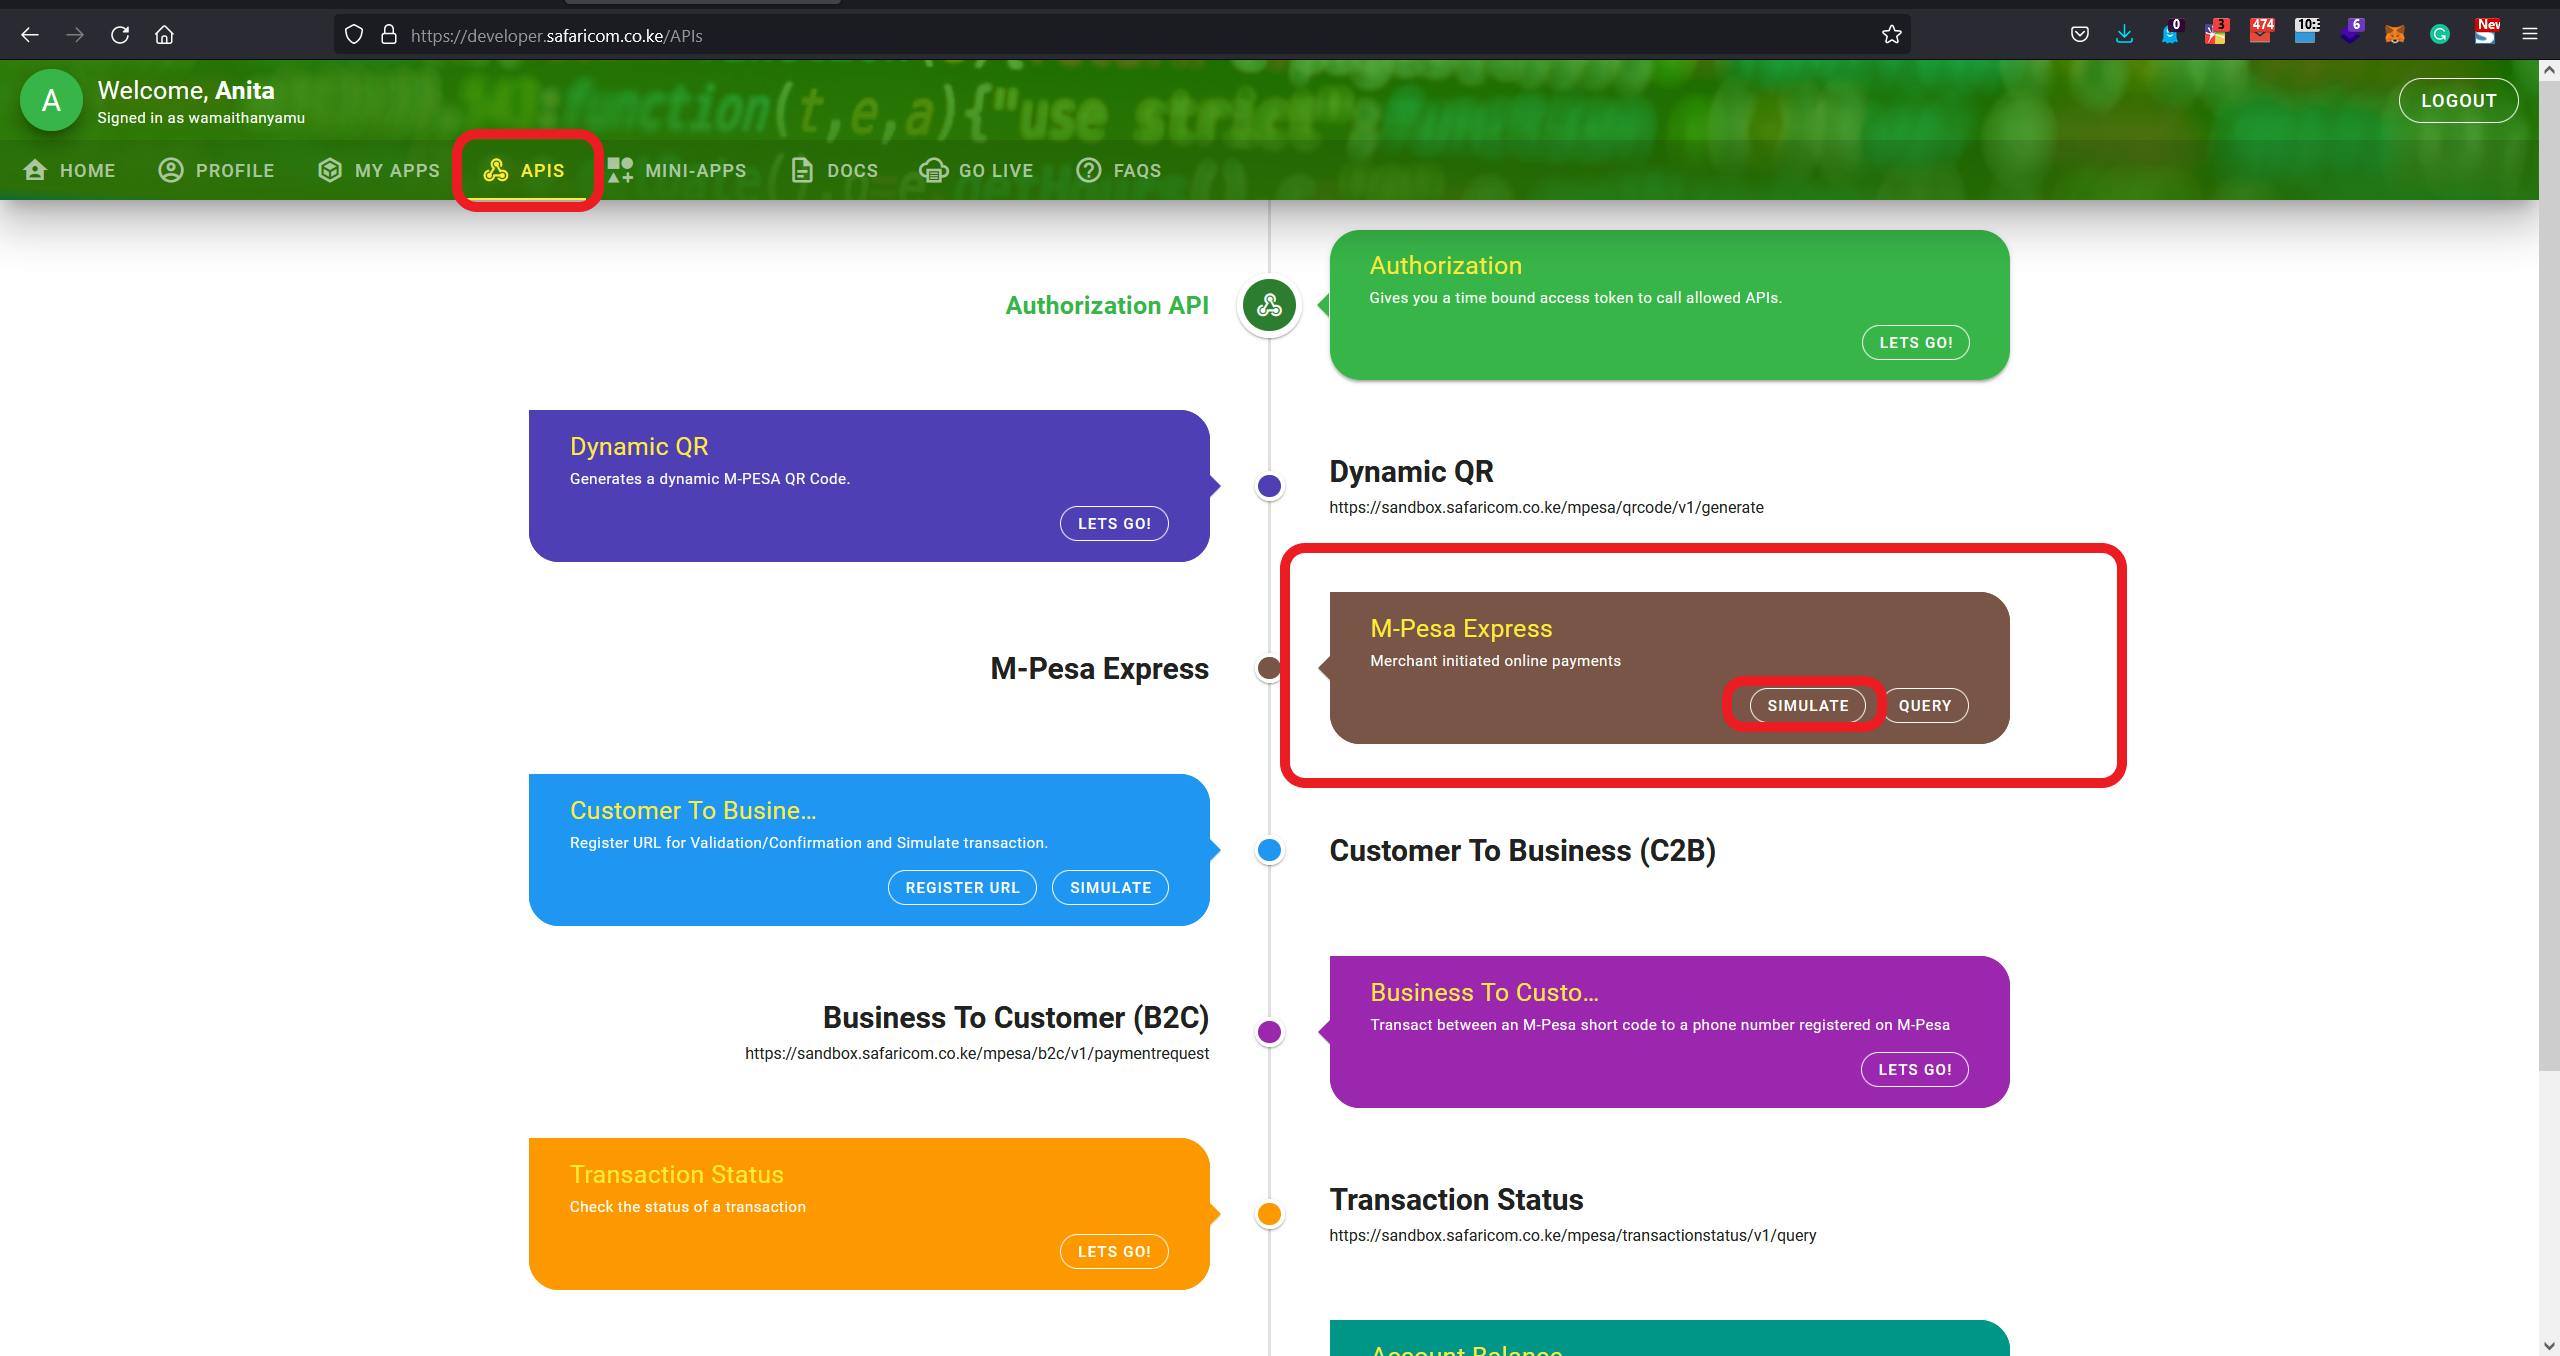
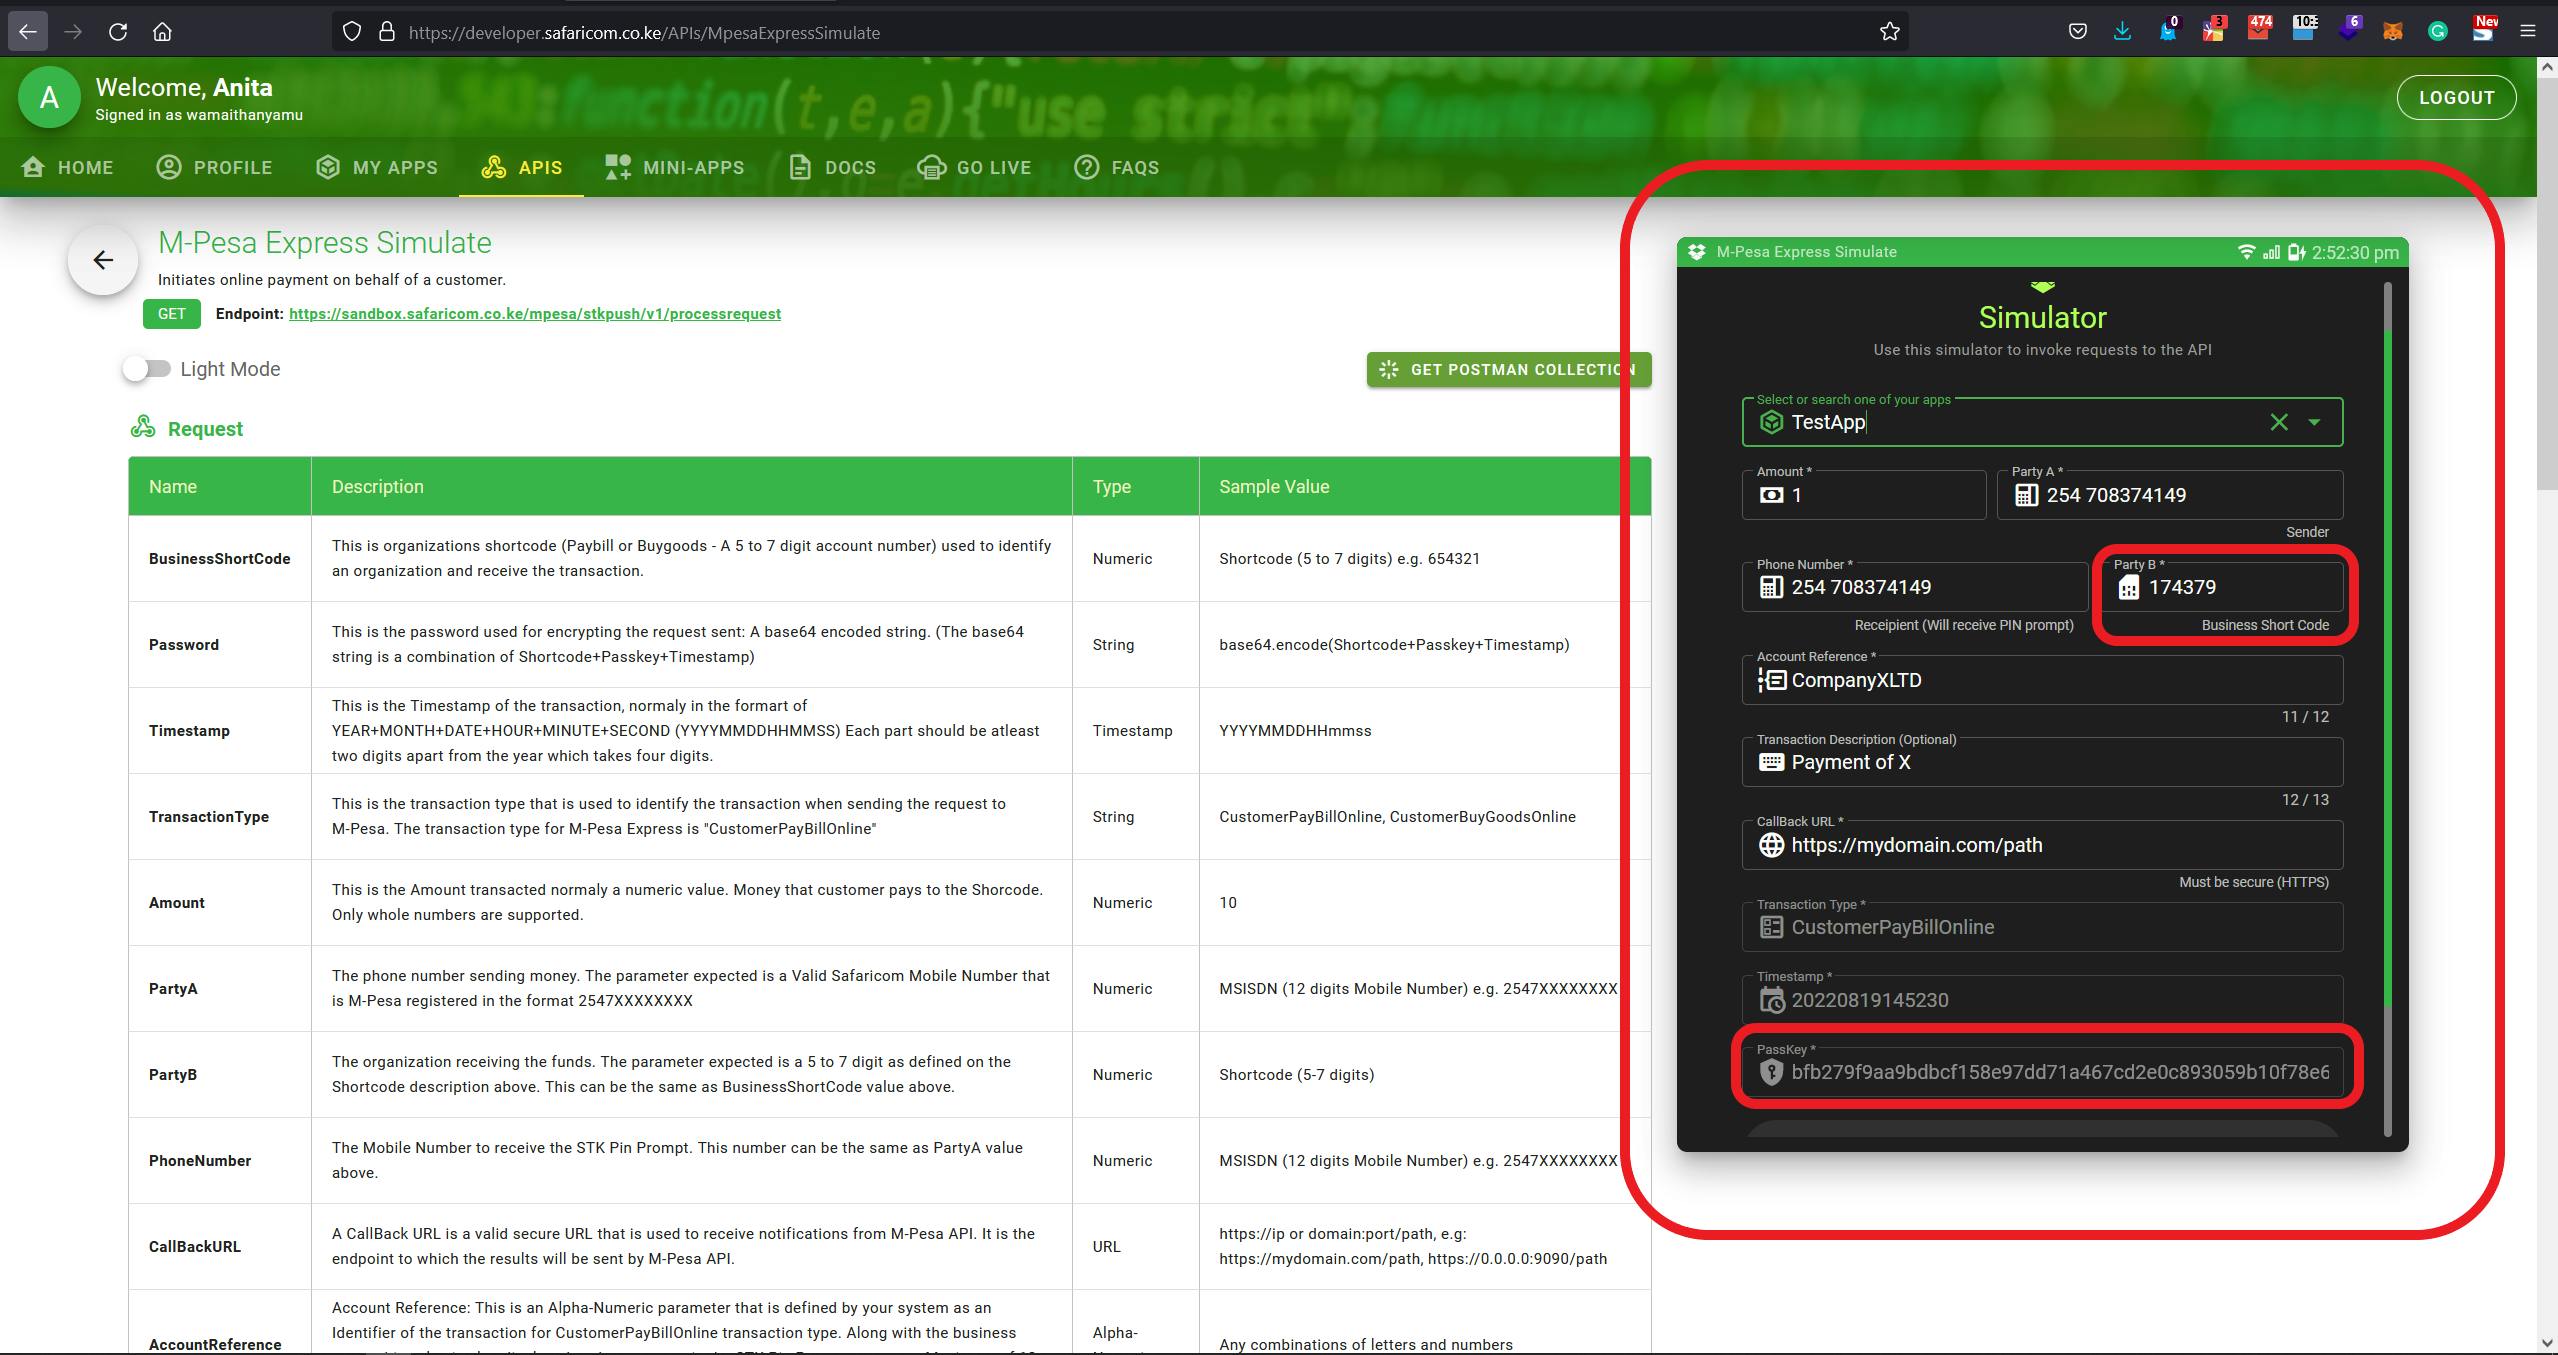
On the simulator on the right, choose the TestApp.
Save the business short code and the passkey in the .env
The complete .env now looks as follows
SAFARICOM_CONSUMER_SECRET=paste_secret_here
SAFARICOM_CONSUMER_KEY=paste_key_here
PASS_KEY=paste_passkey_here
BUSINESS_SHORT_CODE=paste_shortcode_here
PORT=3000 # port your server will run on
The project dependencies can be installed using npm on the root folder at the terminal using
npm install cors dotenv express request ngrok
Cors - package for providing a Connect/Express middleware that can be used to enable CORS .
dotenv - loads environment variables from .env file
express - minimalist web framework
request - making HTTP calls
ngrok - node wrapper for ngrok
Use Case
Let's dive into the code
The code you will cover assumes the user will pay for an order identified by an Order_ID. You will initiate a payment request to the end user for that specific Order_ID. You will also implement a route that confirms the payment was made.
Server
Add the following code in the server.js
import express from "express";
import cors from "cors";
import 'dotenv/config'

// initialize express
const app = express()

// middlewares
app.use(express.json())
app.use(cors())

// import routes
import lipaNaMpesaRoutes from "./routes/routes.lipanampesa.js"
app.use('/api',lipaNaMpesaRoutes)

const port = process.env.PORT

app.listen(port, () => {
    console.log(`App listening on port ${port}`)
})
In the above code, you import relevant libraries, initialize express, and pass the express.json and the cors middleware. In this case, you then import the routes and start the server on the port number in the .env; Port 3000.
Routes
Moving to the routes.lipanampesa.js, the code in this file is as follows
import express from 'express'
const router = express.Router()
import {
    initiateSTKPush,
    stkPushCallback,
    confirmPayment
} from "../controllers/controllers.lipanampesa.js";


import {accessToken} from "../middlewares/middlewares.generateAccessToken.js";

router.route('/stkPush').post(accessToken,initiateSTKPush)
router.route('/stkPushCallback/:Order_ID').post(stkPushCallback)
router.route('/confirmPayment/:CheckoutRequestID').post(accessToken,confirmPayment)

export default router
In the routes file, you initialize the express router and import functions from the controllers.lipanampesa.js file (To be covered in the next section). You also import the accessToken middleware function. This middleware will be used for the authorization of all our Safaricom requests. Lastly, we create three post-request routes that will be used.
The /stkPush route will initiate stk push popup on the users phone.
The /stkPushCallback/:Order_ID route will be the route Safaricom sends the results of the stk push.
The /confirmPayment/:CheckoutRequestID route will use the CheckoutRequestID to confirm payment details. The CheckoutRequestID comes from successfully executing the stk push.
Generating the Access Token
The code in the middlewares.generateAccessToken.js is as follows
import request from "request";
import 'dotenv/config'

export const accessToken = (req, res, next)=> {
    try{

        const url = "https://sandbox.safaricom.co.ke/oauth/v1/generate?grant_type=client_credentials"
        const auth = new Buffer.from(`${process.env.SAFARICOM_CONSUMER_KEY}:${process.env.SAFARICOM_CONSUMER_SECRET}`).toString('base64');

        request(
            {
                url: url,
                headers: {
                    "Authorization": "Basic " + auth
                }
            },
            (error, response, body) => {
                if (error) {
                    res.status(401).send({
                        "message": 'Something went wrong when trying to process your payment',
                        "error":error.message
                    })
                }
                else {
                    req.safaricom_access_token = JSON.parse(body).access_token
                    next()
                }
            }
        )
    }catch (error) {

        console.error("Access token error ", error)
        res.status(401).send({
            "message": 'Something went wrong when trying to process your payment',
            "error":error.message
        })
    }

}
The middleware requests sandbox.safaricom.co.ke/oauth/v1/generate?g.. using the consumer key and consumer secret parsed to base64 as the authorization header. The request returns an access token that we append to the original request as req.safaricom_access_token to be used in the controller that the request will be passed along.
Utils
Before moving to the controllers, you will need a utility function that converts DateTime to the format YearMonthDayHourMinuteSecond
timestamp -> YearMonthDayHourMinuteSecond
For example, the date conversion is as shown below
Date -> 8/20/2022, 9:17:44 AM
Timestamp -> 20220820091744
The code to do this in the utils.timestamp.js is as follows
function parseDate(val) {
    return (val < 10) ? "0" + val : val;
}

export const  getTimestamp = () => {

    const dateString  = new Date().toLocaleString("en-us", {timeZone: "Africa/Nairobi"})
    const dateObject = new Date(dateString);
    const month  = parseDate(dateObject.getMonth() + 1);
    const day  = parseDate(dateObject.getDate());
    const hour = parseDate(dateObject.getHours());
    const minute = parseDate(dateObject.getMinutes());
    const second = parseDate(dateObject.getSeconds());
    return dateObject.getFullYear() + "" + month + "" + day + "" +
        hour + "" + minute + "" + second;
}
The parseDate is a helper function that appends a zero on values less than 10. For example, August the 8th month is converted to 08, 2A.M to 02, etc. Values greater than 10 remain unchanged.
The getTimestamp function gets the current local date time as a string and then converts it to a date object. We get the month, day, hour, minute, and second from the date object. Lastly, the function returns a timestamp in the form YearMonthDayHourMinuteSecond.
Controllers
The first function on the controllers.lipanampesa.js :
import request from "request";
import 'dotenv/config'
import {getTimestamp} from "../Utils/utils.timestamp.js";
import ngrok from 'ngrok'

// @desc initiate stk push
// @method POST
// @route /stkPush
// @access public
export const initiateSTKPush = async(req, res) => {
    try{

        const {amount, phone,Order_ID} = req.body
        const url = "https://sandbox.safaricom.co.ke/mpesa/stkpush/v1/processrequest"
        const auth = "Bearer " + req.safaricom_access_token

        const timestamp = getTimestamp()
        //shortcode + passkey + timestamp
        const password = new Buffer.from(process.env.BUSINESS_SHORT_CODE + process.env.PASS_KEY + timestamp).toString('base64')
        // create callback url
        const callback_url = await ngrok.connect(process.env.PORT);
        const api = ngrok.getApi();
        await api.listTunnels();


        console.log("callback ",callback_url)
        request(
            {
                url: url,
                method: "POST",
                headers: {
                    "Authorization": auth
                },
                json: {
                    "BusinessShortCode": process.env.BUSINESS_SHORT_CODE,
                    "Password": password,
                    "Timestamp": timestamp,
                    "TransactionType": "CustomerPayBillOnline",
                    "Amount": amount,
                    "PartyA": phone,
                    "PartyB": process.env.BUSINESS_SHORT_CODE,
                    "PhoneNumber": phone,
                    "CallBackURL": `${callback_url}/api/stkPushCallback/${Order_ID}`,
                    "AccountReference": "Wamaitha Online Shop",
                    "TransactionDesc": "Paid online"
                }
            },
            function (e, response, body) {
                if (e) {
                    console.error(e)
                    res.status(503).send({
                        message:"Error with the stk push",
                        error : e
                    })
                } else {
                    res.status(200).json(body)
                }
            }
        )
    }catch (e) {
        console.error("Error while trying to create LipaNaMpesa details",e)
        res.status(503).send({
            message:"Something went wrong while trying to create LipaNaMpesa details. Contact admin",
            error : e
        })
    }
}
The function will initiate the stk push to the end user. The code destructures the request body to extract the amount, phone, and Order_ID. You then send a request to https://sandbox.safaricom.co.ke/mpesa/stkpush/v1/processrequest using the access token as the authorization header and the shortcode + passkey + timestamp as the password. This request requires a callback URL which we create using ngrok. Ngrok exposes your server to the internet. You also initialize a tunnel listener that will log any logs from the callback function to the terminal.
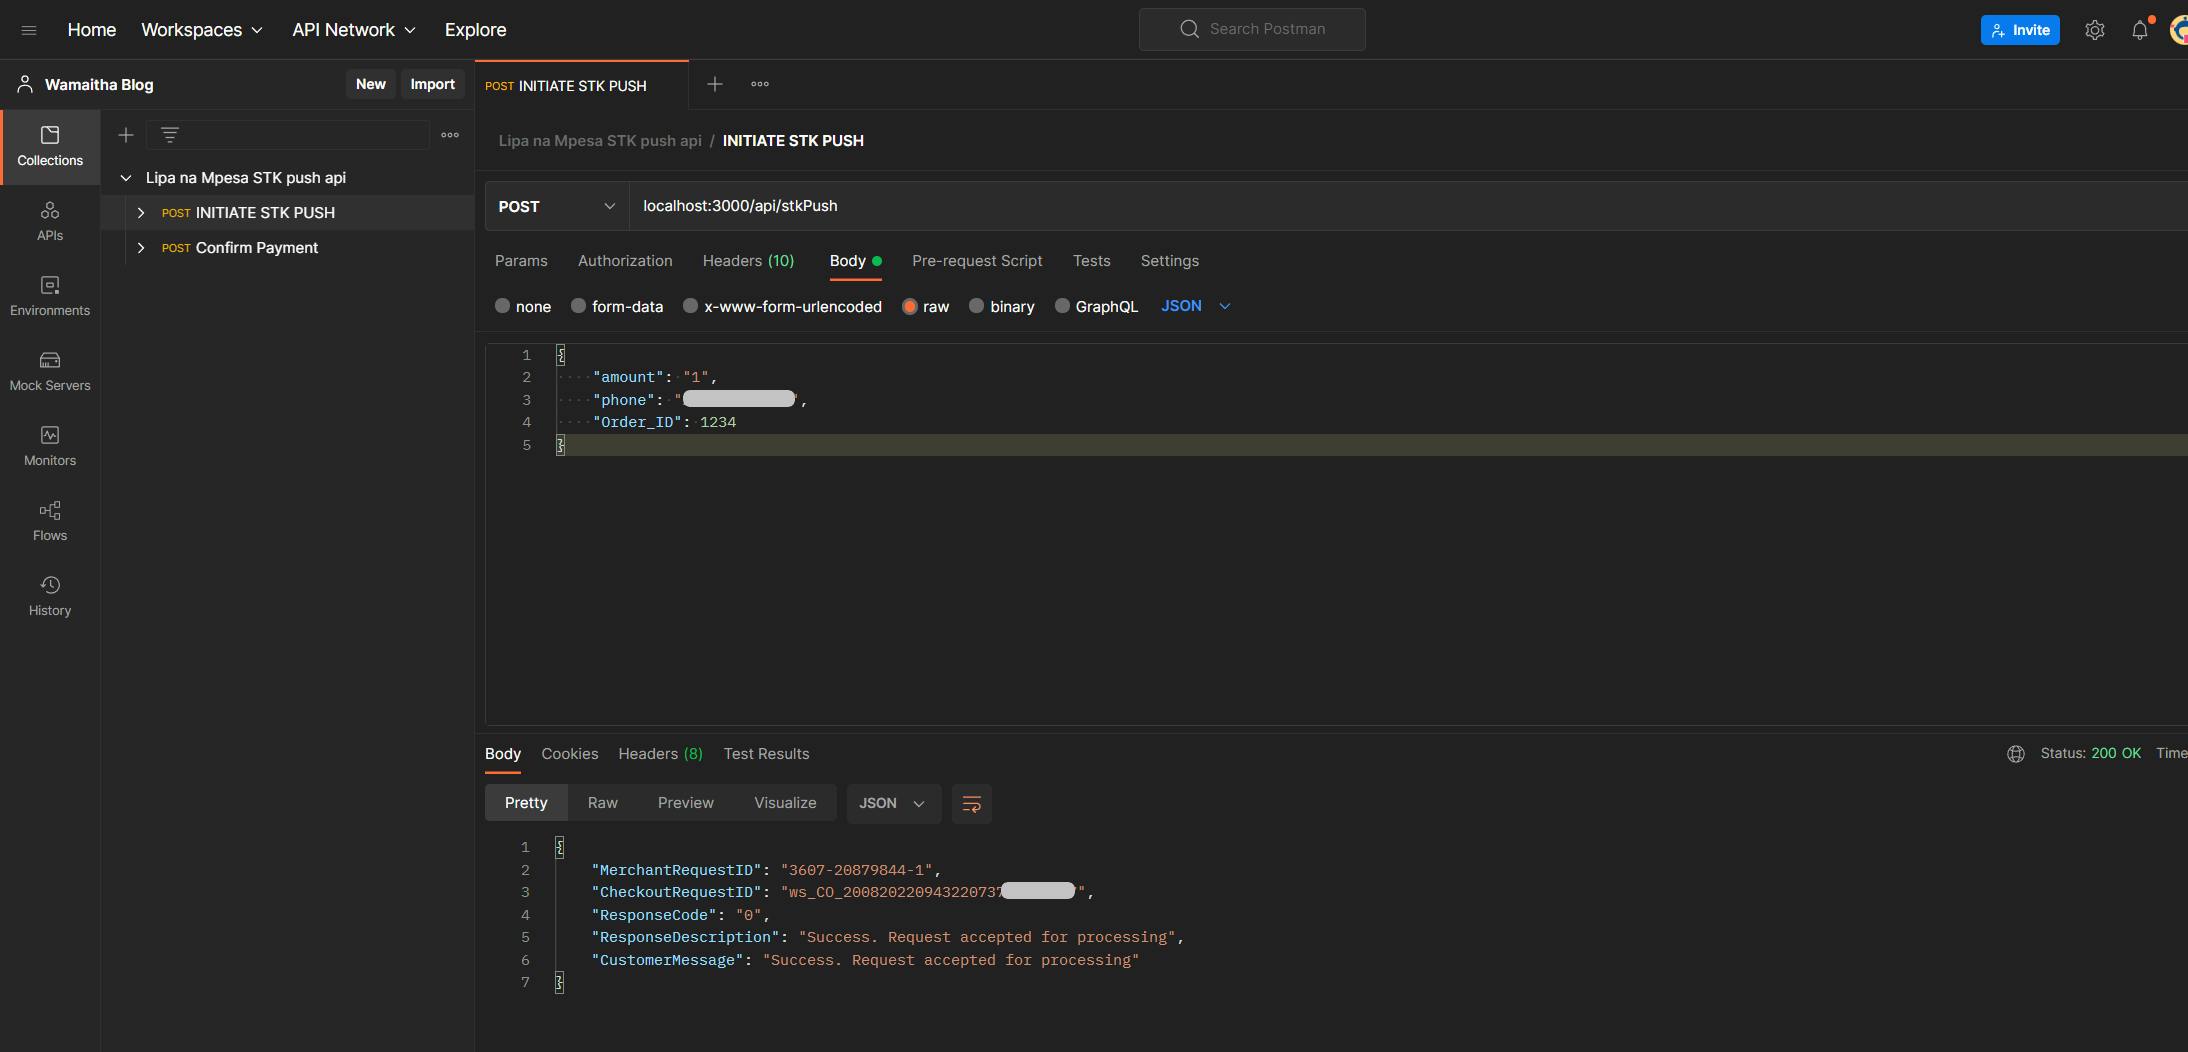
Running this request on post man yields:
On the terminal, you will see a callback logged

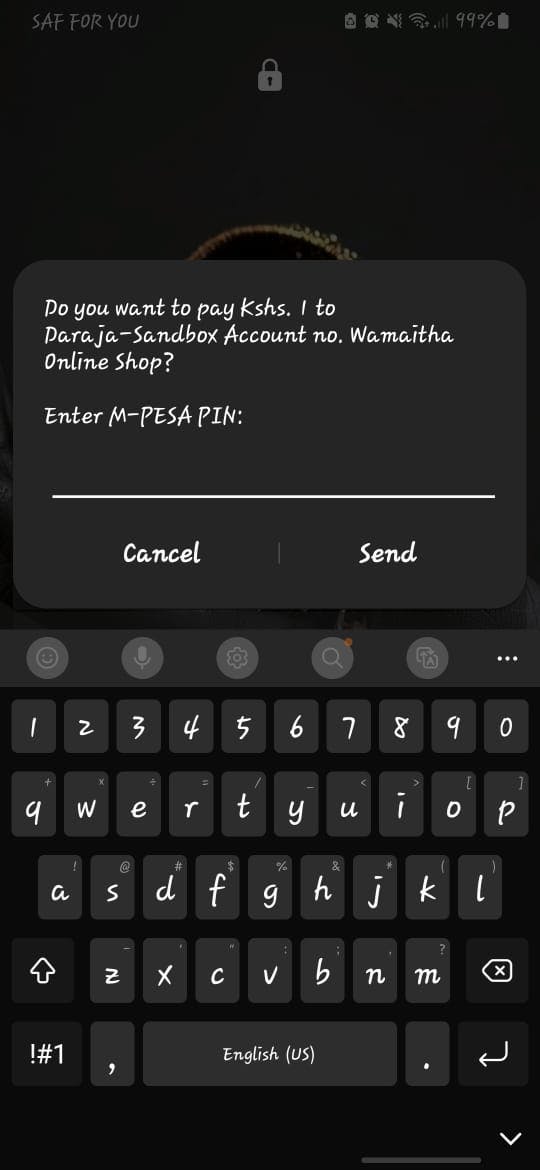
Lastly, the phone number used will receive an stk push as shown
The second function on the controllers.lipanampesa.js :
// @desc callback route Safaricom will post transaction status
// @method POST
// @route /stkPushCallback/:Order_ID
// @access public
export const stkPushCallback = async(req, res) => {
try{
// order id
const {Order_ID} = req.params
//callback details
const {
MerchantRequestID,
CheckoutRequestID,
ResultCode,
ResultDesc,
CallbackMetadata
} = req.body.Body.stkCallback
// get the meta data from the meta
const meta = Object.values(await CallbackMetadata.Item)
const PhoneNumber = meta.find(o => o.Name === 'PhoneNumber').Value.toString()
const Amount = meta.find(o => o.Name === 'Amount').Value.toString()
const MpesaReceiptNumber = meta.find(o => o.Name === 'MpesaReceiptNumber').Value.toString()
const TransactionDate = meta.find(o => o.Name === 'TransactionDate').Value.toString()
// do something with the data
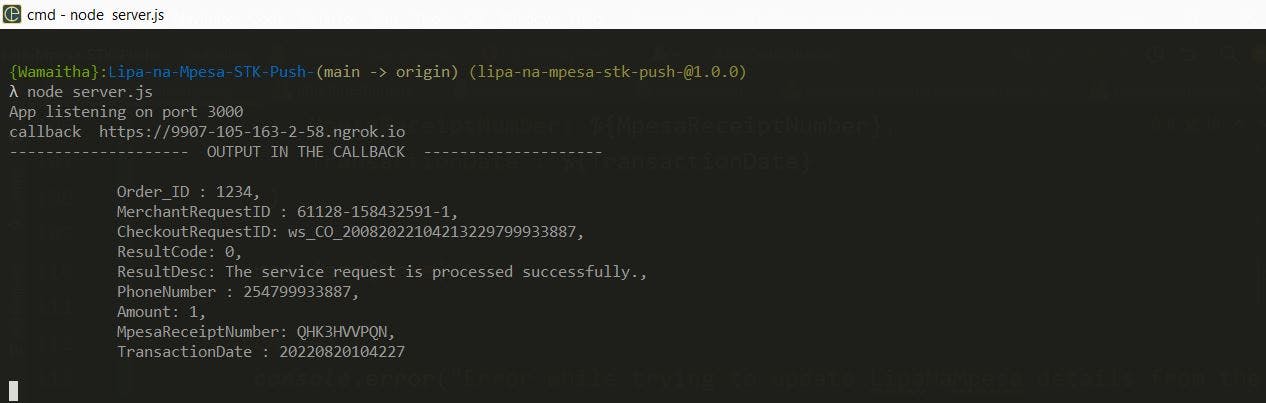
console.log("-".repeat(20)," OUTPUT IN THE CALLBACK ", "-".repeat(20))
console.log(`
Order_ID : ${Order_ID},
MerchantRequestID : ${MerchantRequestID},
CheckoutRequestID: ${CheckoutRequestID},
ResultCode: ${ResultCode},
ResultDesc: ${ResultDesc},
PhoneNumber : ${PhoneNumber},
Amount: ${Amount},
MpesaReceiptNumber: ${MpesaReceiptNumber},
TransactionDate : ${TransactionDate}
`)
res.json(true)
}catch (e) {
console.error("Error while trying to update LipaNaMpesa details from the callback",e)
res.status(503).send({
message:"Something went wrong with the callback",
error : e.message
})
}
}
The callback function simply destructures the request body and prints it to the console. At this point, you can save the response to any database you choose.
Rerunning the /stkpush endpoint on postman yields the following on the terminal:
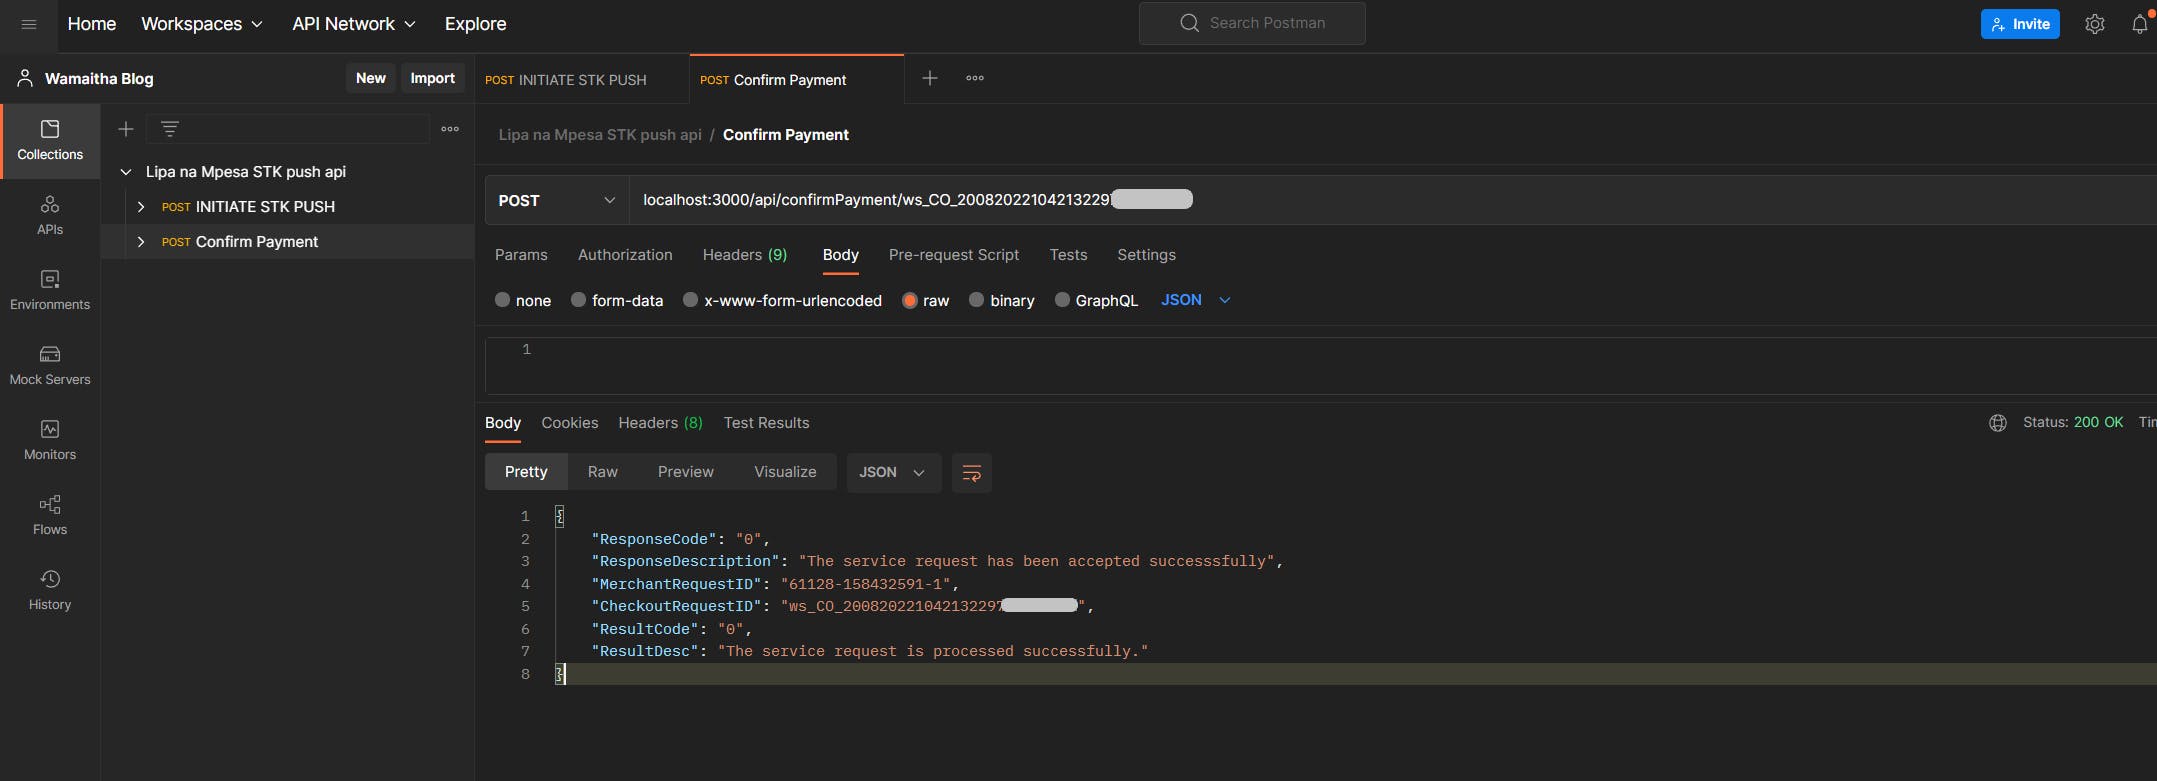
The last part is confirming payments using the CheckoutRequestID.
The final function in the controller file is as shown
// @desc Check from safaricom servers the status of a transaction
// @method GET
// @route /confirmPayment/:CheckoutRequestID
// @access public
export const confirmPayment = async(req, res) => {
    try{


        const url = "https://sandbox.safaricom.co.ke/mpesa/stkpushquery/v1/query"
        const auth = "Bearer " + req.safaricom_access_token

        const timestamp = getTimestamp()
        //shortcode + passkey + timestamp
        const password = new Buffer.from(process.env.BUSINESS_SHORT_CODE + process.env.PASS_KEY + timestamp).toString('base64')


        request(
            {
                url: url,
                method: "POST",
                headers: {
                    "Authorization": auth
                },
                json: {
                    "BusinessShortCode":process.env.BUSINESS_SHORT_CODE,
                    "Password": password,
                    "Timestamp": timestamp,
                    "CheckoutRequestID": req.params.CheckoutRequestID,

                }
            },
            function (error, response, body) {
                if (error) {
                    console.log(error)
                    res.status(503).send({
                        message:"Something went wrong while trying to create LipaNaMpesa details. Contact admin",
                        error : error
                    })
                } else {
                    res.status(200).json(body)
                }
            }
        )
    }catch (e) {
        console.error("Error while trying to create LipaNaMpesa details",e)
        res.status(503).send({
            message:"Something went wrong while trying to create LipaNaMpesa details. Contact admin",
            error : e
        })
    }
}
The function takes a similar construct as the initiate stkpush function, but on the JSON body, we pass in the CheckoutRequestID, which we get from the request params. Executing the function on post man confirms the payment, as shown below
You did it!
The full code can be found here